Showing posts with label Video Game Love. Show all posts
Monday, June 30, 2014
Cross Stitch Zelda iPhone 5 Case
I am SOOOO excited to share this with you today because:
1) The Legend of Zelda is one of my favorite video game series ever in existence
2) First time cross stitching (!!!)
3) Cross stitching on an iPhone case!
Super exciting! Haha. I lost that screw to the LifeProof case (RIP screw) and decided to buy one of these cases that I've been eyeing for a while. I knew I wanted to reference Zelda on my case and after scouting Pinterest, found this glorious design, fell in love and straight up made my own version! All I had to do was count the stitches and mark them on graph paper. Super easy!
This was my first time cross stitching so I'll share my experience with you. I had a general idea about what I was doing and knew I had to make a lot of x's on the front of the case. The case comes with a booklet that briefly shows you how to cross stitch, which helped out a bunch. But, the booklet didn't explain how to move down to the next row in a way that looked nice, so I just went for it. I also had to figure out how to move across the design in a way that would create the least amount of jumbled thread mess on the back of the case.
The DMC floss is made up of 6 strands, but I removed one of the strands hoping that it would make stitching a little easier. Did that help? A little. Could have removed a couple more strands. Pliers helped me pull the needle through most of the time. Oh, the needle. Let's talk about the needle! The needle that comes with the case is flimsy and cheap and actually snapped in half after using it for a couple of hours. Srsly wow. Nothing a quick visit to Michael's couldn't fix (previous statement is dangerous, I am aware)! What size needles did I need? The box or the booklet didn't leave any indication of needle size so I had to use my eyes and guess. I left with embroidery needles size 26 AND 28 just so I could feel for myself. I started out with a 26, but that ended up breaking after a while too! Not sure if it was my tenacity or just poor needle quality, but I was happy to have an extra 9 needles to continue my project. I switched to the 28's for the remainder of my project and broke an extra 3 before I ended up finishing. No words.
I started this project last Wednesday and after a few long sessions of White Collar binging and crafting, I finished it Sunday afternoon. Cross stitching took a lot longer than expected, but I was impressed at how quickly I completed this project.
Onto the next!
Lisa
Sunday, December 1, 2013
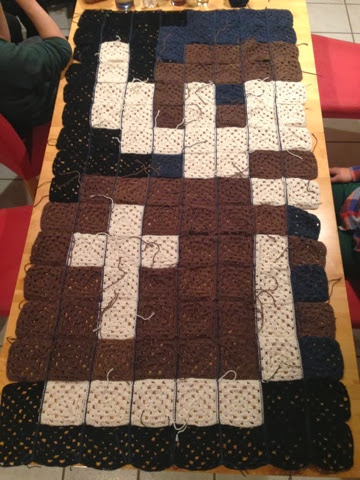
Pixelated Link Blanket Progress Pics
Good news everyone! The blanket is finished for the most part.
On Friday I crocheted the last 6 black squares, connected the last two columns, and connected 7 rows of my blanket. It was a very productive day seeing that I would be spending most of Saturday in the car, making the gloriously boring adventure back down to sunny SoCal. There was holiday traffic, which extended the lifespan of said adventure.
I now have 6 rows left to connect before the blanket is truly finished, which is totally cool because the blanket still looks finished. Mwahahahaha.
Thursday, November 28, 2013
Friday, November 22, 2013
Wednesday, November 20, 2013
Monday, October 28, 2013
Pixelated Link Blanket
I am finally (!!!) making this pixelated Link blanket that I have wanted to make since forever ago. There is quite a bit of planning that goes into making a blanket, including just how much yarn to buy, what kind of yarn to buy, what kind of crochet hook to use, you get the picture. My goal is to finish this blanket by November 30th, and friends, I will make it happen. It is cold now that winter is coming and the best way to stay warm is to cover myself in a nice home-made blanket.
Some fun information for you:
208 squares total
dimensions are 16 squares x 13 squares
each granny square is 4.5 - 5 inches long
= a huge blanket
Materials:
Sugar 'n Cream cotton yarn in brown, blue (Link's outfit will be blue not green!), and tan
Cascade Ultra Pima cotton yarn in black
Some fun information for you:
208 squares total
dimensions are 16 squares x 13 squares
each granny square is 4.5 - 5 inches long
= a huge blanket
Materials:
Sugar 'n Cream cotton yarn in brown, blue (Link's outfit will be blue not green!), and tan
Cascade Ultra Pima cotton yarn in black
Size H crochet hook
Current progress pics:
Finishing:
This is an awesome AWESOME tutorial on joining granny crochet squares written by Attic24. I will definitely be finishing my blanket with this technique.
Current progress pics:
Finishing:
This is an awesome AWESOME tutorial on joining granny crochet squares written by Attic24. I will definitely be finishing my blanket with this technique.
More progress pics and updated information to come. Can't wait to show you!
Tuesday, June 11, 2013
Inspiration
I plan on making this blanket in the near future:

All I need is a good granny square pattern and I am set!
The counterpoint scarf I made for my sister has inspired me to challenge myself to make other cool illusion knit pieces such as this piece from Woolly Thoughts:

It would be so wonderful to have a knitted piece of art hanging on my wall, especially if it looks as awesome as this tiger!
The counterpoint scarf I made for my sister has inspired me to challenge myself to make other cool illusion knit pieces such as this piece from Woolly Thoughts:
It would be so wonderful to have a knitted piece of art hanging on my wall, especially if it looks as awesome as this tiger!
Subscribe to:
Posts (Atom)